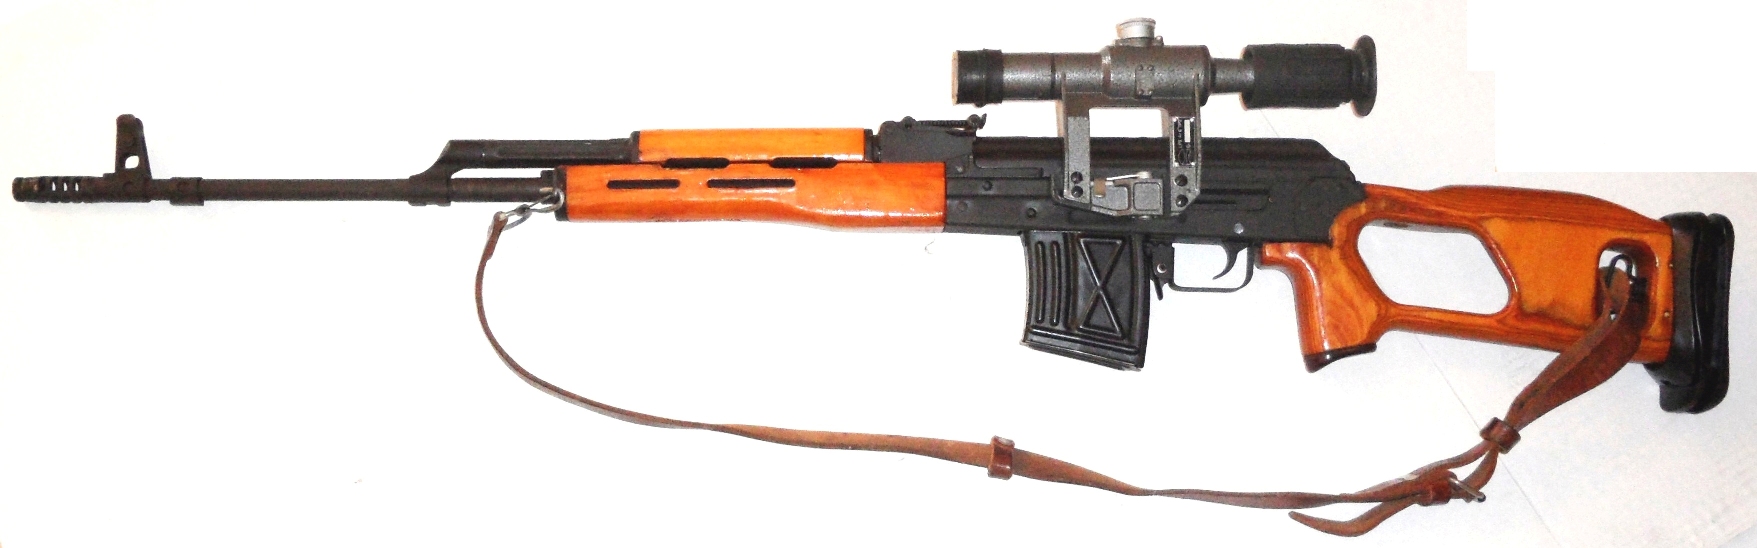
The Romanian PSL-54C is an AK-47 derivative rifle. I have always been fascinated by the AK-47 rifle. The original AK-47 was one of the first true "assault rifles" to be manufactured and put into service. Even after six decades the model and its variants remain the most widely used and popular assault rifles in the world because of their durability, low production cost, and ease of use. It has been manufactured in many countries and has seen service with many armed forces. The AK-47 was the basis for developing many other types of individual and crew-served firearms. More AK-type rifles have been produced than all other assault rifles combined.
In Romanian, PSL stands for Pusca Semiautomata cu Luneta model 1974, or "scoped semi-automatic rifle model 1974". The PSL is basically a semi-automatic AK-47 on anabolic steroids. The receiver was lengthened for the much more powerful 7.62x54R Russian round and tailored for use as a sniper rifle.
The PSL's Cartridge
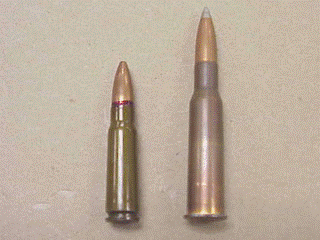
In this photograph you can see the 7.62x39 AK-47 round on the left, and the 7.62x54R PSL round on the right. The 7.62x54R is a rimmed rifle cartridge developed by the Russian Empire and was introduced as a service cartridge in 1891. Originally designed for the bolt-action Mosin Nagant rifle, it was used during the late Tsarist era and throughout the Soviet period to the present day in machine guns and rifles such as the SVT-40. This cartridge remains one of the few standard issue rimmed cartridges still in military use and has the longest service life of all military issued cartridges in the world. Although the bullets of the two cartridges are the same diameter (7.62mm), the PSL bullet weighs in at 149 grains (light-ball), while the bullet of the AK-47 weighs in at 123 grains.
There are two fundamental types of 7.62x54R ammunition: Heavy-Ball and Light-Ball. The Heavy-Ball round has a bullet weight of 174 grains and is NOT to be used in the PSL. The PSL is designed for use with the Light-Ball 149 grain cartridge. The Heavy-Ball round can damage the PSL.
Comparison: AK-47 round (left) vs PSL round (right)
The 7.6x54R is the oldest cartridge still in regular combat service with several major armed forces in the world. In 2011 the cartridge reached the 120 years in service mark. The 7.62x54R is currently (2011) mainly used in sniper rifles like the Dragunov, PSL, and machine guns like the PKM. The ballistic performance is similar to the .308 Winchester/7.62x51 NATO cartridge.
Building A PSL from Parts
STEP 0 (I'm a computer nerd, I start with 0) - Getting the parts
There is really no economic incentive whatsoever to building a rifle from parts. I'm a tinkerer. I love machines, gadgets, and gizmos, and learning how they work. I love taking them apart and putting them back together. What better way to understand the internal operation of firearms than to build them, to fit the parts together and file and grind.
Keep in mind that all information and photos here are for informational purposes only. I do not even attempt to include every aspect of building a safe rifle, and I did not include here every step I took to assure that this one was safe and legal. This is just a summary of my build. No amount of explanation can replace experience and intelligence. If you're a moron, you should not even be handling a firearm much less trying to build one. You know who you are! But then again, if you're a moron, you might not.
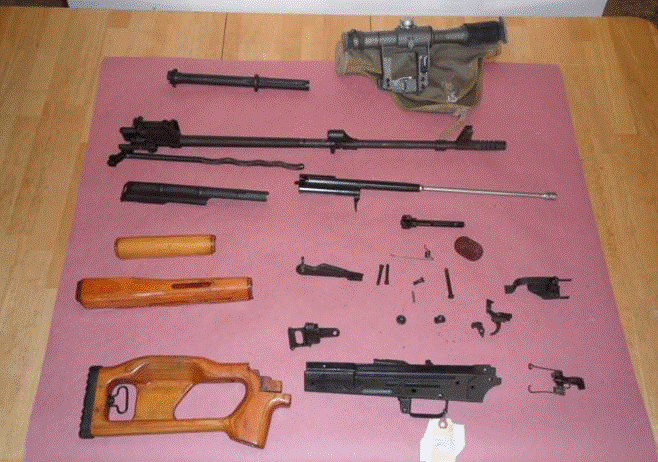
The photo below shows what I started with. I picked up a set of used PSL parts from a de-milled Romanian PSL, a brand new Romanian made receiver with scope side-plate, and an original PSL sniper scope from Centerfire Systems. This is my starting point. Note that the bayonet lug has been removed from the barrel. Also, the muzzle brake is permanently attached.
STEP 1 - Getting that darn front trunnion off of the barrel assembly
On firearms, the barrel is sometimes mounted in a trunnion, which in turn is mounted and riveted to the front of the receiver. This usage is common for tubular or pressed metal frame guns, such as the AK-47, PPSh-41, Uzi, Sten, and others. When an AK-47 (or similar) firearm is de-milled for importation into the United States, the receiver is torched into little pieces leaving the trunnion on the barrel.
Our first step in reassembling this sexy firearm is to remove the barrel from the trunnion. The barrel is secured to the trunnion in two ways: 1 - The barrel is very tight pressure fit into the trunnion. The barrel was installed into the trunnion at the factory with high pressure pressing machines. 2 - Once the barrel was inserted into the trunnion, the factory drilled a hole through the trunnion and part of the barrel and inserted a hardened steel pin, also a very tight pressure fit.
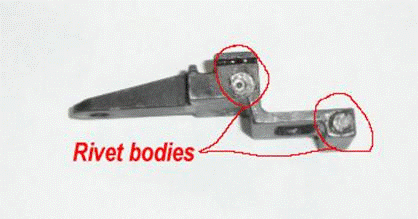
Once the barrel is off of the trunnion, we then have to extract the two rivet bodies from the trunnion.
Both of these operations are hard and you will learn to curse like a sailor in the process. The photo below shows the barrel and trunnion as I received it.
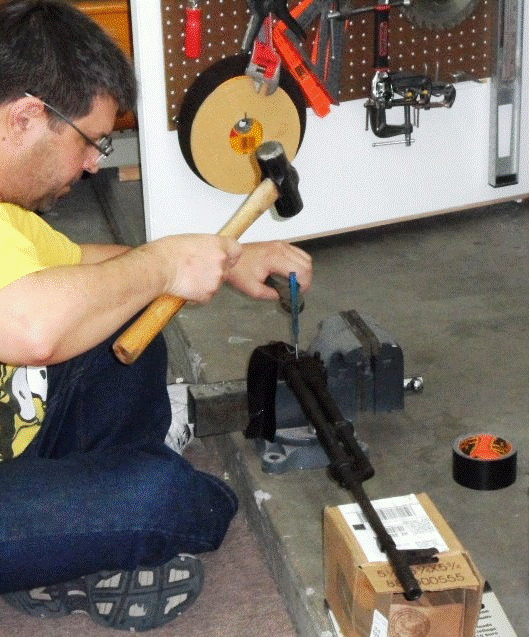
STEP 1a - Removing the barrel pin
I do not have professional gunsmith equipment, as is painfully and embarrassingly obvious in the photo below. If I can do this, anyone can. A mini-sledge hammer, a punch, and anvil sort of. Lots of very careful but firm hammering. Cursing in languages you don't even know. It can be done. I did it without leaving any marks on the trunnion, and left the pin in perfect condition.
SAVE THE PIN THAT YOU REMOVE HERE. It will need to be reinstalled later.
STEP 1b - Pulling the trunnion off of the barrel
This step exercised every bit of good old Yankee ingenuity. After scratching my head for a while I got the bright idea of using a steering wheel puller to push the barrel off of the trunnion. You can see my jig for doing this in the photo below. Steering wheel puller is on the left, barrel assembly is on the right, all held together in a clamp. The function of the clamp is to keep the steering wheel puller arms from popping off the sides. It worked great!
VERY IMPORTANT: In the center of the photo, note that golden color between the puller's plunger and the chamber. Those are a couple of brass washers to prevent damage to the chamber. The brass is softer than the hardened steel and will deform thus prevent the plunger from damaging the breech.
STEP 1c - Getting those freakin' rivet bodies out of the trunnion
This was REALLY, REALLY hard. With a setup similar to Step 1a, I banged the rivet bodies out of the trunnion. A mini-sledge hammer, a punch, and anvil sort of. Lots of very careful but firm hammering. More cursing in tongues. By sheer luck there was no damage to the trunnion.
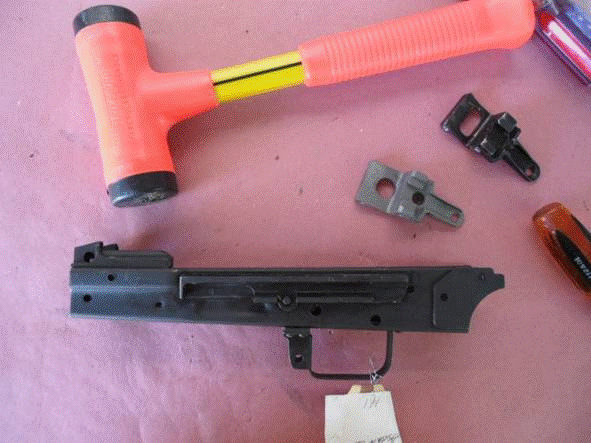
STEP 2 - Getting the rivet bodies out of the rear trunnion/stock tang ***CRISIS # 1***
In a manner similar to the front trunnion, there is a rear trunnion, a.k.a. stock tang, that is mounted and riveted to the rear of the receiver. The stock then attaches to the rear trunnion. The photo below shows the PSL rear trunnion as I received it. Here is where I hit my first crisis. Not only did I utterly fail to get the rivet bodies out of the trunnion, but I pretty much ruined the trunnion in the process. I searched and searched but could not find a replacement ANYWHERE. At least not one with the rivet bodies removed. I was NOT going to go through that again. Now I'm starting to sweat.
After much research it turns out that the AK-47 rear trunnion is dimensionally identical to the PSL rear trunnion and should fit the PSL perfectly. So I searched for an AK-47 rear trunnion on-line, found a brand new American made one (WITH NO RIVET BODIES STUCK INSIDE), and ordered it. With the exception of having to slightly widen the holes for the rivets (PSL rivets are slightly wider), it fit perfectly (I did have to dremel a little curved notch in the back to match the PSL notch)! Whew!! Saved.
STEP 3 - Mounting the trunnions into the new receiver
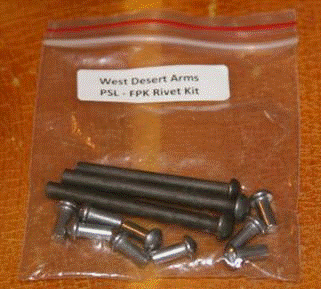
The next hard part is getting the old trunnions into the new receiver and riveted. The front and rear trunnions fit into the new receiver with relatively little effort after a little persuasion from a plastic mallet. You MUST use the correct rivets. Fortunately, the correct rivets are available on-line at AKBuilder or at West Desert Arms. Although since the Romanian receiver comes with its own trigger guard already riveted in you will not need the five trigger guard rivets that come with the set.
In this photo I've gotten the front trunnion into place and am about to slide in the stock tang, with the help of my little friend, the plastic mallot.
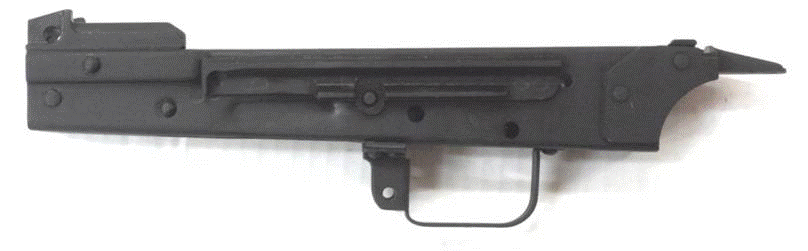
Finally!! I now have the receiver with the front trunnion and stock tang riveted into place. Isn't she hot?
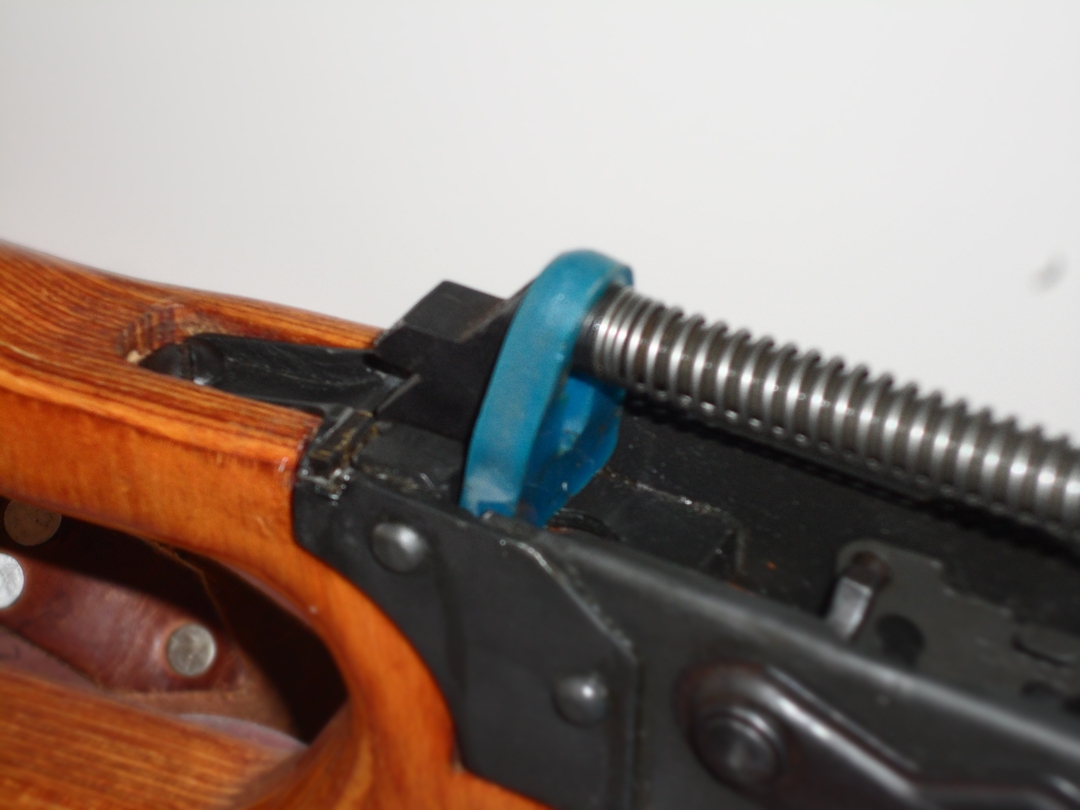
STEP 4 - Fitting the telescopic sight ***CRISIS # 2***
Now I run into a problem I NEVER anticipated. I tried, for the first time, to test fit the scope onto the scope rail AND IT DIDN'T FIT!! The scope rail was way too wide, by a lot. I called Centerfire Systems (where I bought the receiver AND the scope for it) and asked WTF? Their response was that the manufacturing equipment at the factory in Romania was slowly getting out of whack. Every year the scope mount rail was a little wider. Either the Romanians don't care, or they are idiots. At first you could easily file the excess down by hand. Now it was over 1/8 of an inch too wide; impossible to fix by hand. Too bad, so sad. So, I took my receiver and scope to my favorite Master Gunsmith, Allen Vaughn, at Guns Etc in Chandler, Arizona and he fixed it for me. The scope fits very well now.
STEP 5 - Initial fitting of the bolt carrier
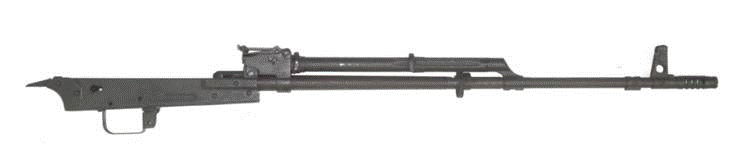
The PSL, like the AK-47, is a gas-operated direct-impingement firearm. With gas-operated direct-impingement, a portion of high pressure gas from the cartridge being fired is used to power a mechanism to extract the spent case and chamber a new cartridge. Energy from the gas is harnessed through a port in the barrel after the bullet has passed by the port. This high-pressure gas impinges on the surface of a piston head pushing the piston and bolt carrier backwards to provide motion for unlocking of the action, extraction of the spent case, ejection, cocking of the hammer, chambering a fresh cartridge, and locking of the action. Below is a picture of the PSL bolt carrier and attached piston and piston rod.
The bolt carrier did not fit right off the bat, nor did I expect it to. Building an AK-47 or derivative from a third world country is not like building an American AR-15. I've built more than one of those too. The AR-15 is a precision, high quality American machine with parts made to American military specifications. No matter how scattered the source of parts for an AR-15 build, they go together like a dream. No filing, no fitting, no hammering.
Not so with the AK-47. The AK-47 is designed to be made and assembled in third world shitholes by a labor force composed of knuckle dragging apes. It was then to be handed out to an army of uneducated peasants who couldn't find their own asses with both hands and a GPS navigation system. That's why I love building them. It's a challenge. Without fancy gunsmith equipment it requires a good deal of ingenuity, imagination, and risk.
The original bolt carrier in this new receiver was tighter than a ducks ass so a good bit of fitting will be required. I engaged in some precision filing on the rails and bolt carrier guides on the receiver until the bolt fit into the receiver and moved back and forth as it should.
STEP 6 - Refinishing the receiver assembly
But now I have a bunch of bare metal exposed where the gunsmith did his work on the scope rail and where I did my initial fitting of the bolt carier. Also, the finish the Romanians put on the receiver was not exactly top notch. So after the scope rail was fixed I took the receiver to Robar Guns in Phoenix Arizona and had the whole thing refinished with their Phosphating process. Phosphating, better known as "Parkerizing", is a process involving the transformation of the surface of the steel to a rust resistant manganese or zinc phosphate. Phosphating is a non-reflective, matte black finish that resists corrosion and abrasion. The coating has a sponge-like structure that entraps oil or other corrosion resistant solutions producing an excellent coating for firearms exposed to high humidity and/or harsh environments. Phosphating will hide light scratches, pitting, or blemishes. Now it really looks great!! The photo below shows the fixed scope rail and refinishing.
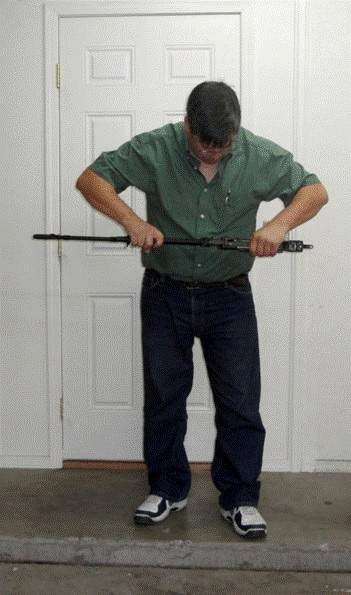
STEP 7 - Reinstalling the barrel
From all the research I did, installing the barrel is the hairiest part of the assembly. Everyone talks about using 12 ton hydraulic presses, or running stainless steel all-thread through the bore and pulling the barrel into the receiver by tightening a nut at the muzzle end. Everyone blogged about being scared of bending the long thin 24 inch barrel, which I heard has happened. There has to be a better way. After putting on my thinking cap for a while, I came up with a way that was so incredibly easy and risk free that it's stunning in its simplicity. Key is the fact that this particular barrel and this particular trunnion were made for each other at the beginning of this rifle's life in the Romanian factory.
But for this plan to work, I had to be quick and sneaky. After my wife went to sleep, I made sure my freezer was at its coldest setting and secured the barrel in the freezer for the night. I left it there all night because it was important for every atom of the barrel to be reduced to the lowest possible energy level. Here is the barrel in my freezer.
In the morning I further realized that the whole gun can easily assume a temperature of 115 degrees F just sitting on the shooting bench at the outdoor range in the middle of the summer here in Phoenix, Arizona. So I warmed up the receiver just a little bit past room temperature to about 95 degrees F. This will have no affect whatsoever on the heat treatment of the receiver. The result was spectacular. I greased the receiver barrel hole and the back end of the barrel. Then, USING MY BARE HANDS, I slipped the barrel right into the receiver trunnion and adjusted it until the barrel pin hole of the barrel lined up perfectly with the barrel pin hole of the trunnion.
The barrel was so cold that it literally hurt my hand. But now that I started I did not dare stop and look for gloves. Every second that went by that barrel was a second closer to room temperature and expanding into the trunnion hole. Then with mini-sledge and a punch I QUICKLY hammered the barrel pin back into place securing the barrel. Once the whole assembly had assumed room temperature, the original very tight pressure fit was recreated. Here is a photo of me inserting the barrel into the trunnion by hand.
Understand that every set of parts is different, especially if you have a non-matching numbers kit. Mine was a numbers-matching kit. Cold soaking the barrel and slightly heating the receiver may not work quite as well with your kit. Or it may. But under ALL circumstances it will most absolutely help a great deal. It will greatly reduce the amount of force needed, thereby minimizing the chances of a bent barrel. I had the all-thread method for installing the barrel all set up as my backup contingency plan. But I never needed it. In any case, DO NOT FORGET THE GREASE.
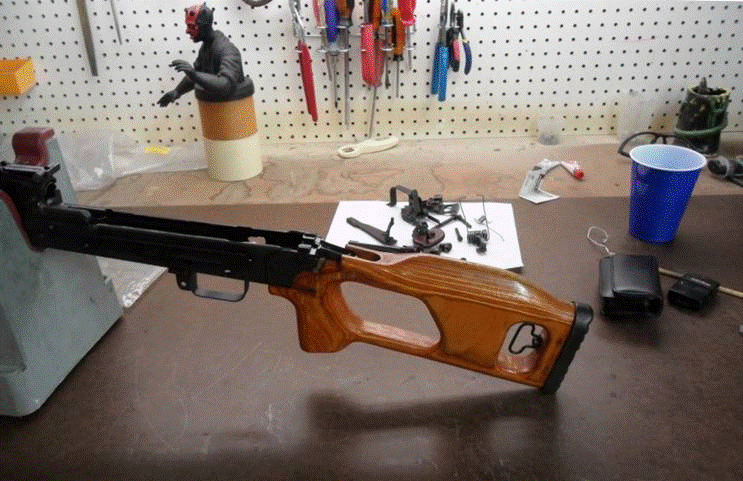
And here is the finished Receiver/Barrel assembly.
STEP 8 - Fitting the stock
The next step was fitting the stock to the new receiver. While I had to do some sanding and filing, it was not as much as some other AK builds I've done. In this photo I have the stock halfway in. Just a little more sanding and shaping to do. I also fitted the wooden front hand guards though I neglected to take a photo of that.
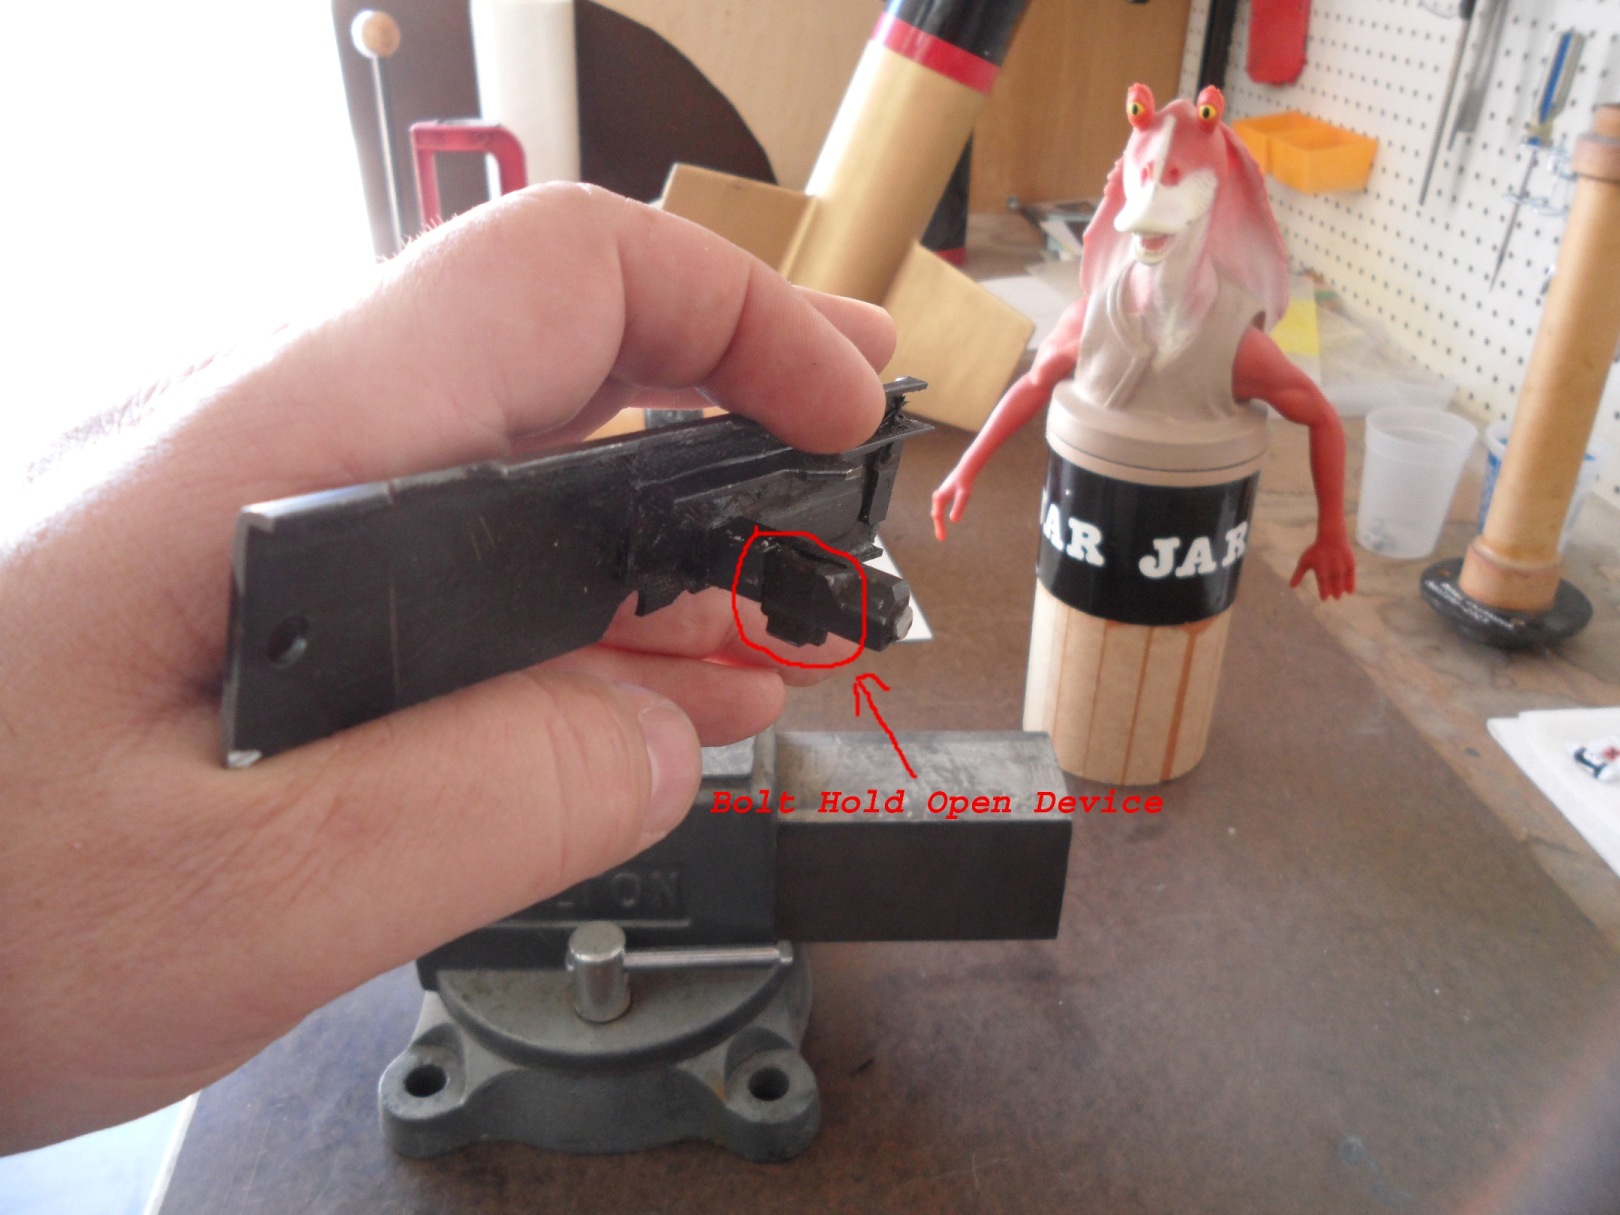
STEP 9 - Installing the Bolt Hold-Open
The bag of parts from the de-milled original PSL includes the slice of receiver to which is welded the old scope mount and the cross support piece. It is included for a reason: the cross support piece contains the bolt hold-open device which you need to transfer to the new receiver. The photo below shows the original bolt hold open device in the slice of destroyed original receiver.
The bolt hold open device is held in with a pin that you will need to remove. The pin is quite obvious once you look at it. Referring to the photo below, using a punch of the appropriate size, bang out the BHO retaining pin. Be careful: the bolt open hold open device consists of a small sliding plate and a small spring. You don't want to lose either. If you do, you'll be sorry!
Naturally, the sliding piece from the old receiver was a way-too tight fit on the new receiver. In this photo, I had to do just a little bit of filing on the opening in the new receiver to get it to fit right. I just wish I had done this step before refinishing the receiver.
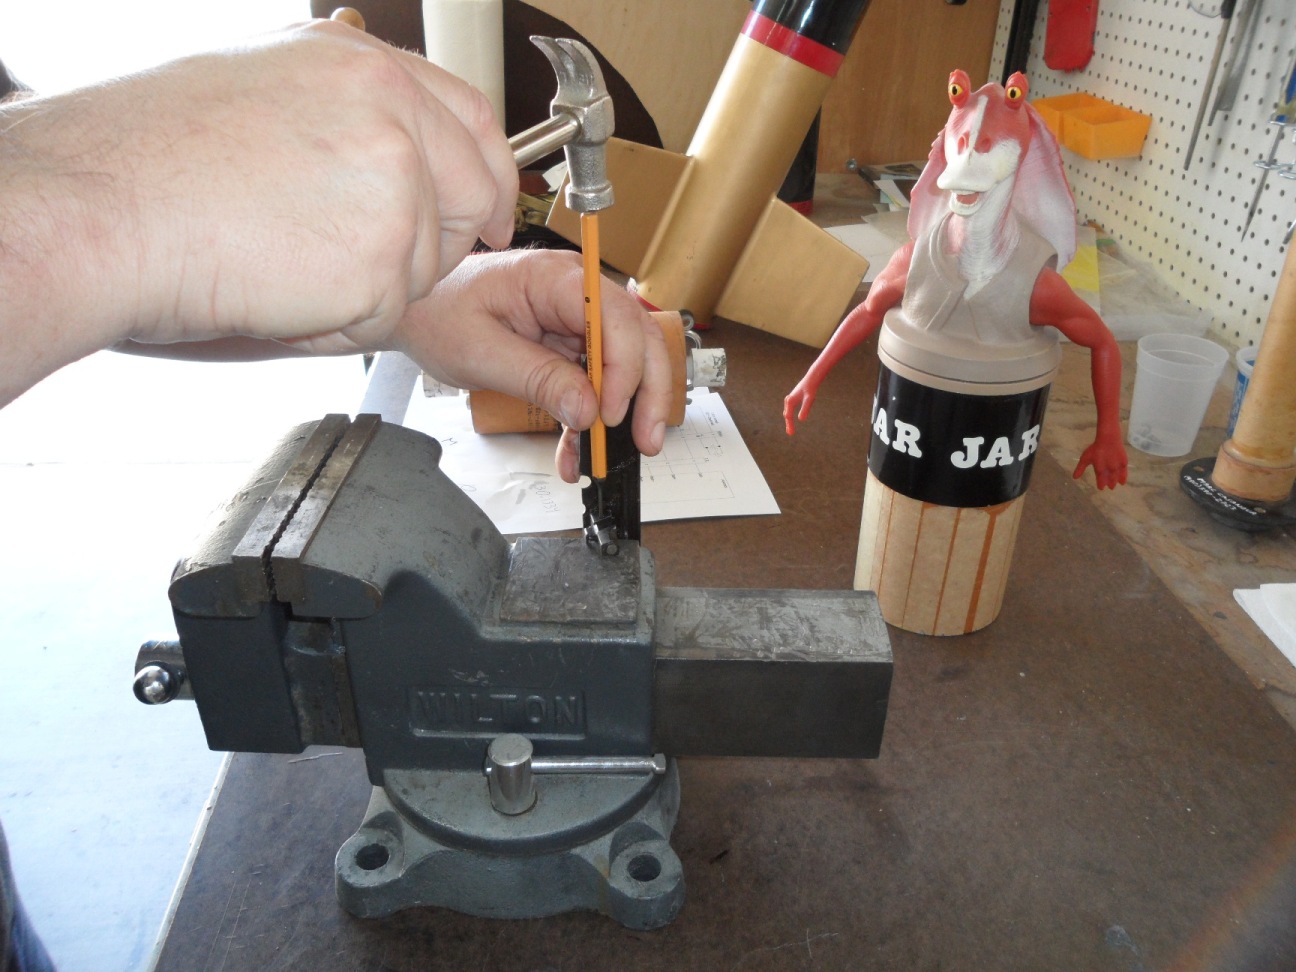
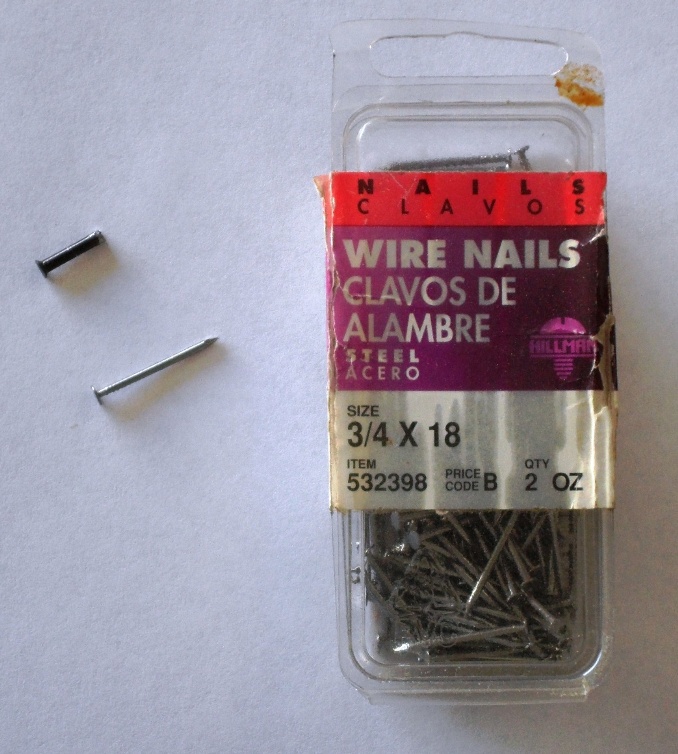
Naturally, the hole for the pin on the new receiver was much smaller than the hole for the pin from on old receiver. About half the size! God bless those Romanians. I found that some 3/4x18 wire nails were a perfect fit in the undersize hole. After positioning the slide with spring, push the nail in from the magazine side of the bar. While holding it firmly in, with a small jewelers hammer bend the other end of the nail as close to the bar as possible and clip to length.
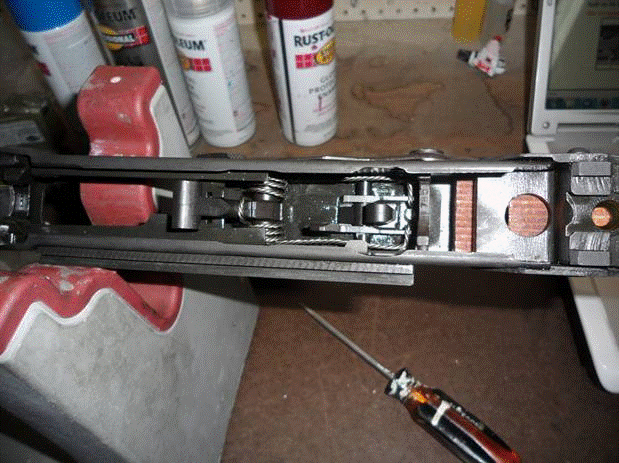
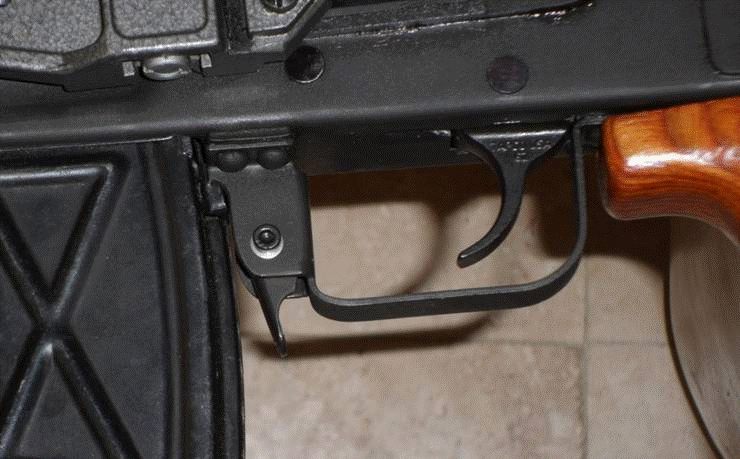
STEP 10 - Trigger group and hammer
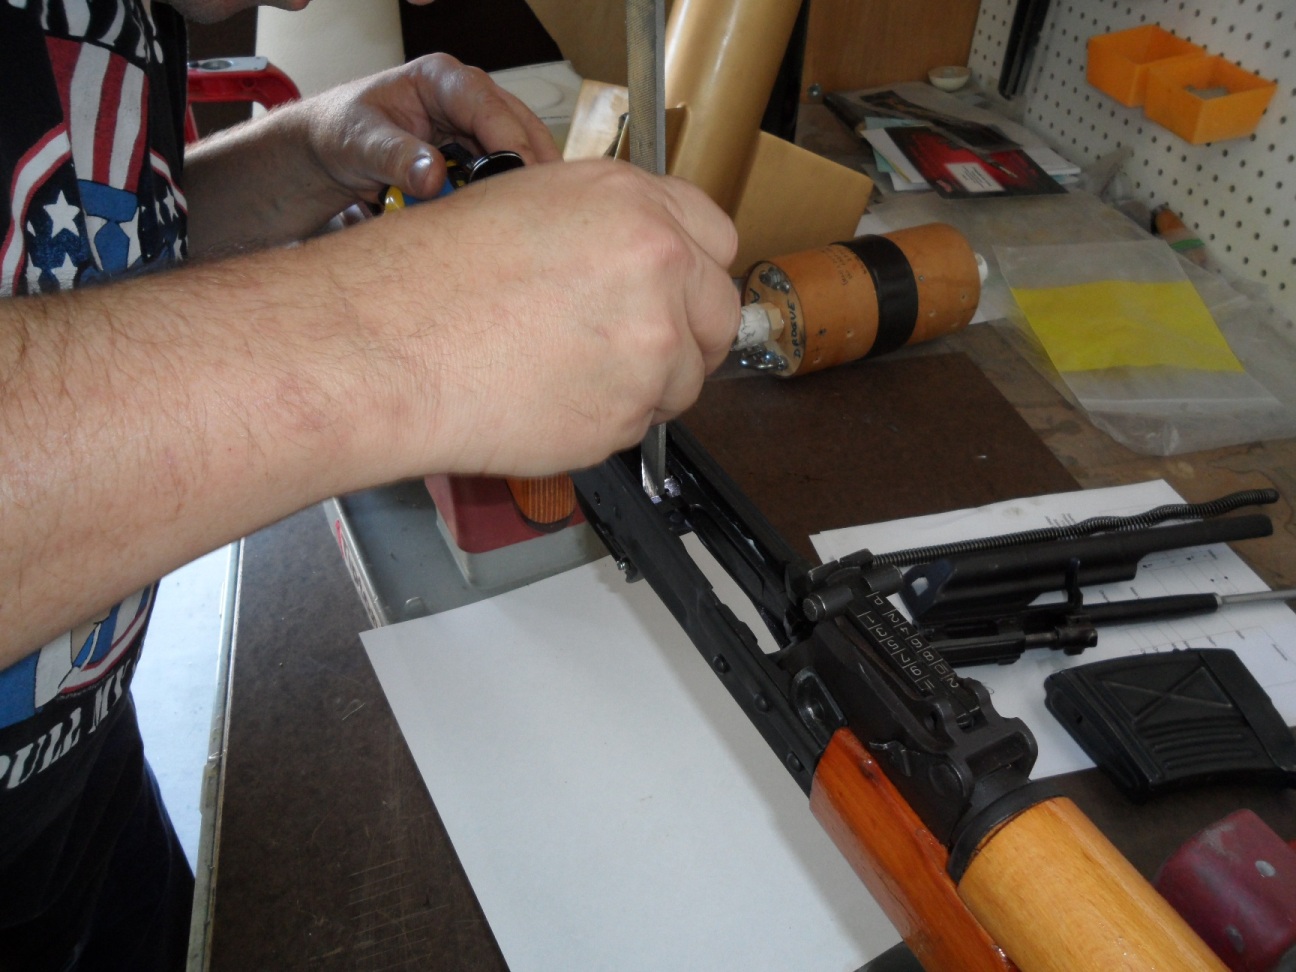
As I mentioned earlier, the Romanian PSL is based on the AK-47. The trigger group of the AK-47 and the PSL are interchangeable with no modifications. I did have to slightly grind down the retaining plate, but that is not an original AK-47 part. The photo below shows the Tapco single hook trigger group that I used for this build. Research led me to believe that the double hook trigger group would not fit the PSL. The Tapco trigger group is great because it offers an improved trigger pull of 3-4 pounds and eliminates the painful trigger slap common with original AK-47 triggers. It also has a "no fumble" trigger sleeve which allows you to assemble the trigger group outside of your rifle and then drop it in as one piece. As you can see in the photo below, the kit comes with a Single Hook Trigger, Hammer, Disconnector, the "No Fumble" Trigger Sleeve, and the Retaining Plate. You must reuse all the springs from the original PSL.
Tapco provides excellent installation instructions on their web site, so I won't reproduce them here. The photo below shows the Tapco AK-47 trigger group, along with the original springs from the bag of parts, installed into the new PSL receiver.
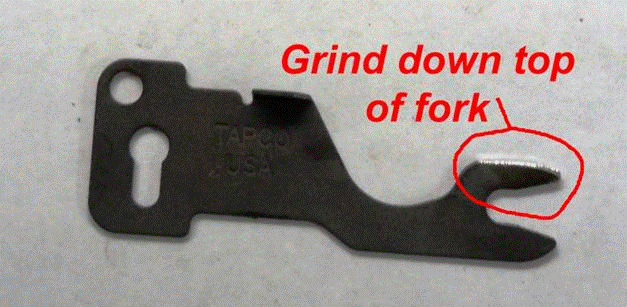
As I mentioned earlier, it was necessary to grind down the top of the Retaining Plate to get the fork into the notch in the hammer pin. This was necesary to get the retaining plate to fit under the rail. The photo below shows how I ground down the top of the fork. Before grinding, the top and the bottom of the fork were symmetrical.
STEP 11 - Last but not least in the assembly process, the magazine release assembly
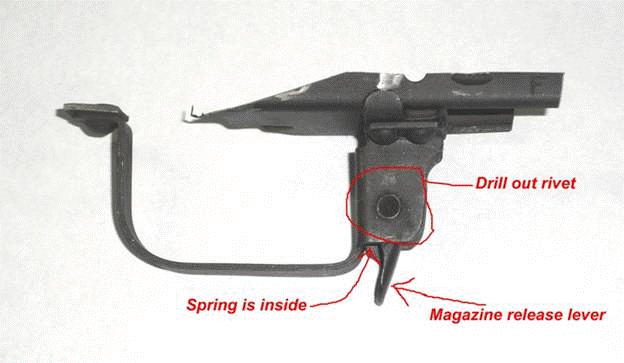
Lastly, I needed to move the magazine release assembly from the original trigger guard that came with the remains of the original PSL in the bag of parts. The photo below shows the original trigger guard still attached to the remains of the destroyed receiver. I needed to liberate the magazine release lever and the spring from its old prison in the trigger guard. Simple: drill and punch.
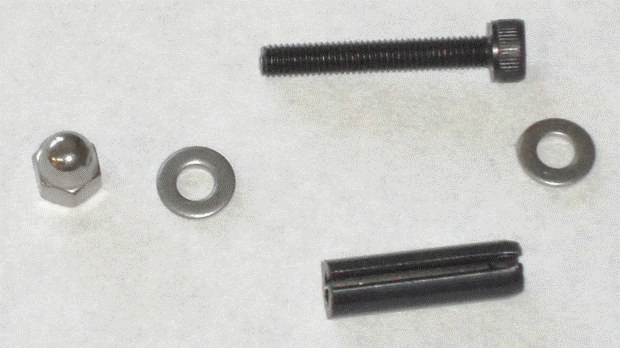
I decided to bolt the magazine release lever into the new trigger guard with a roll pin. The photo below shows all the parts for the new installation of the magazine release. The roll pin is key. It is hardened steel and will take all of the abuse of the magazine release as the rivet did in the original. The bolt just holds it in place and does not have to be strong. The roll pin is the largest roll pin I could find that still fit into the rivet hole of the new receiver. The roll pin in the photo is cut to the same width as the trigger guard.
Not shown in the photo is a second roll pin. While it gets thrown away in the end, it is essential to the installation. This second roll pin is cut to only the width of the release lever, which fits inside the trigger guard. Here are the steps:
1 - Place the spring into position within the release lever and secure in place with the short roll pin.
2 - Slide that assembly in place within the trigger guard. This step involves compressing the spring. Line up the rivet hole in the release lever to the rivet hole in the trigger guard.
3 - Once the holes are lined up, push the long roll pin into place through the trigger guard rivet hole, pushing the short roll pin out and replacing it with the long roll pin. Once this is done the release lever should be functional, though not secure.
4 - Push the bolt through the center hole of the roll pin with a washer on either side. USING LOCKTITE, install the Acorn nut. DONE!!
And the finished release lever:
STEP 12 - And for the cherry on top
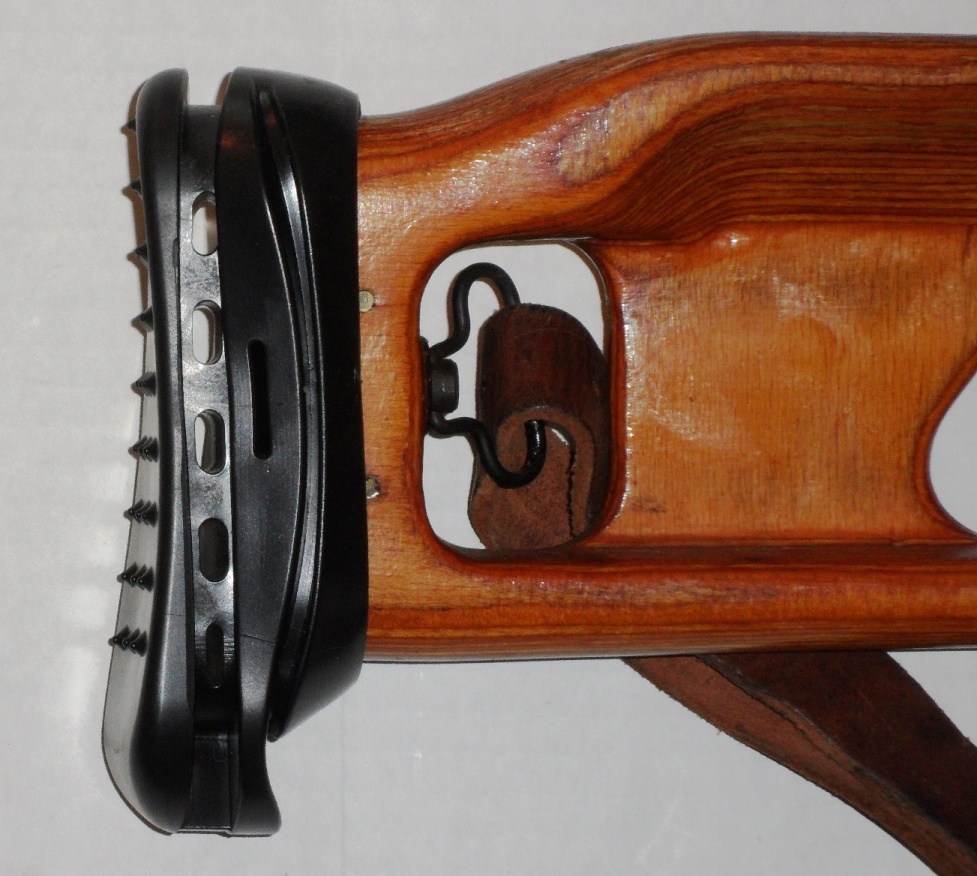
The rifle is now complete. But for the cherry on top I added a PSL specific recoil pad. This recoil pad is made specifically for the PSL and serves two purposes: 1 - Absorb recoil, and 2 - Add an inch of length to the butt stock. The butt stock is much shorter than most Western shooters are used to. This is because Romanian soldiers often operate in very cold climates and wear thick winter coats while operating. So this rubber stock extender was made to be fitted during warm weather although one is not issued with the rifle. And, as you can see in the photo below, I also added a leather sling.
Time To Test
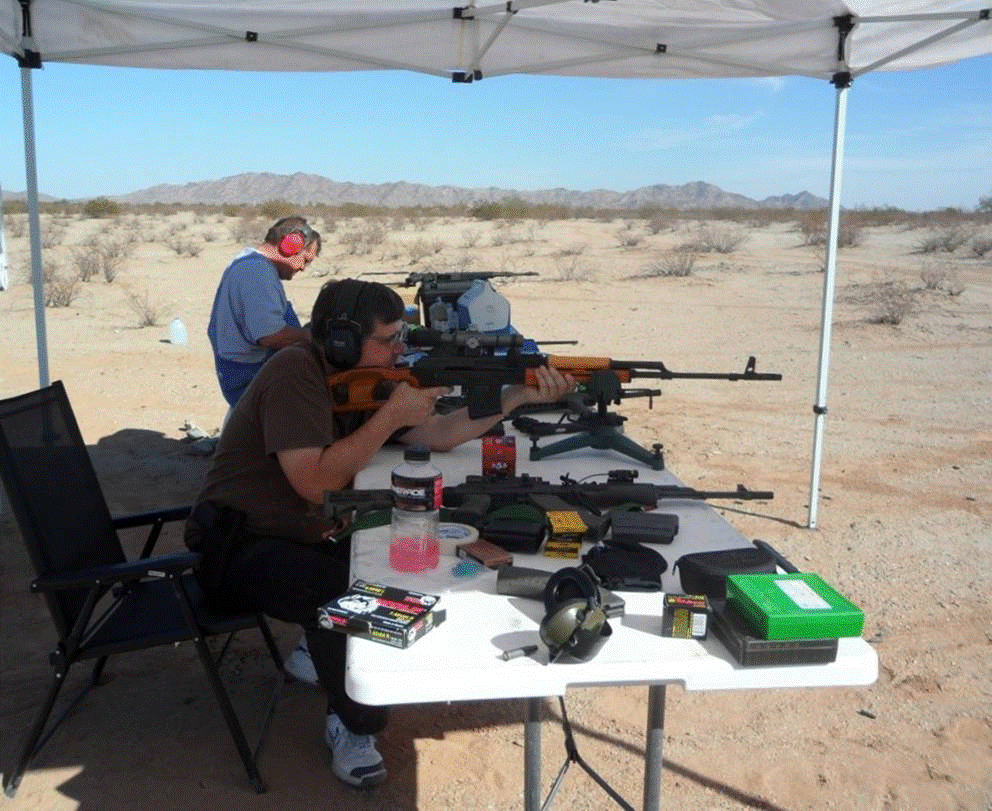
Finally, the assembly is completed. In calendar time it took me over a year to finish this project simply because of lack of time to spend on it due to many other priorities, like real work (to pay the bills) and family. But, it's now done, so let's go take it for a spin out in the desert. In the photo below I've got it set up on the table with a front rest. This is not going to be a very good test since I'm on a rickety table and only have a front rest. For a really good test of its accuracy I need to take it to the formal outdoor shooting range where there are solid concrete shooting benches with accurately measured distances. I'll also need my shooting sled which I don't have here. So, whatever the results are here, it will be MUCH better at the real shooting range.
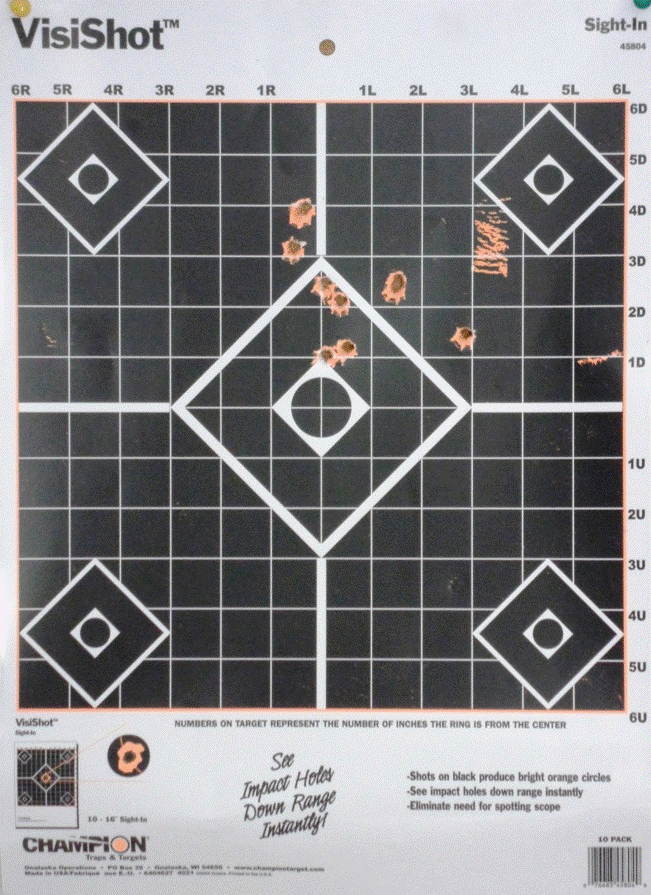
The last photo shows 10 rounds at the target, at what I guestimate was about 50 yards. It looks like 8 holes but closer examination show two slightly elongated holes. I am quite pleased with this! I can't wait to have time to go to the formal outdoor shooting range and try again.
A Final Adjustment to the Receiver
The AK-47 and its variants, like the Romanian PSL, are not fine precision machines as are American made firearms such as the AR-15. Often, after construction, there are some final tweaks to get it just right.
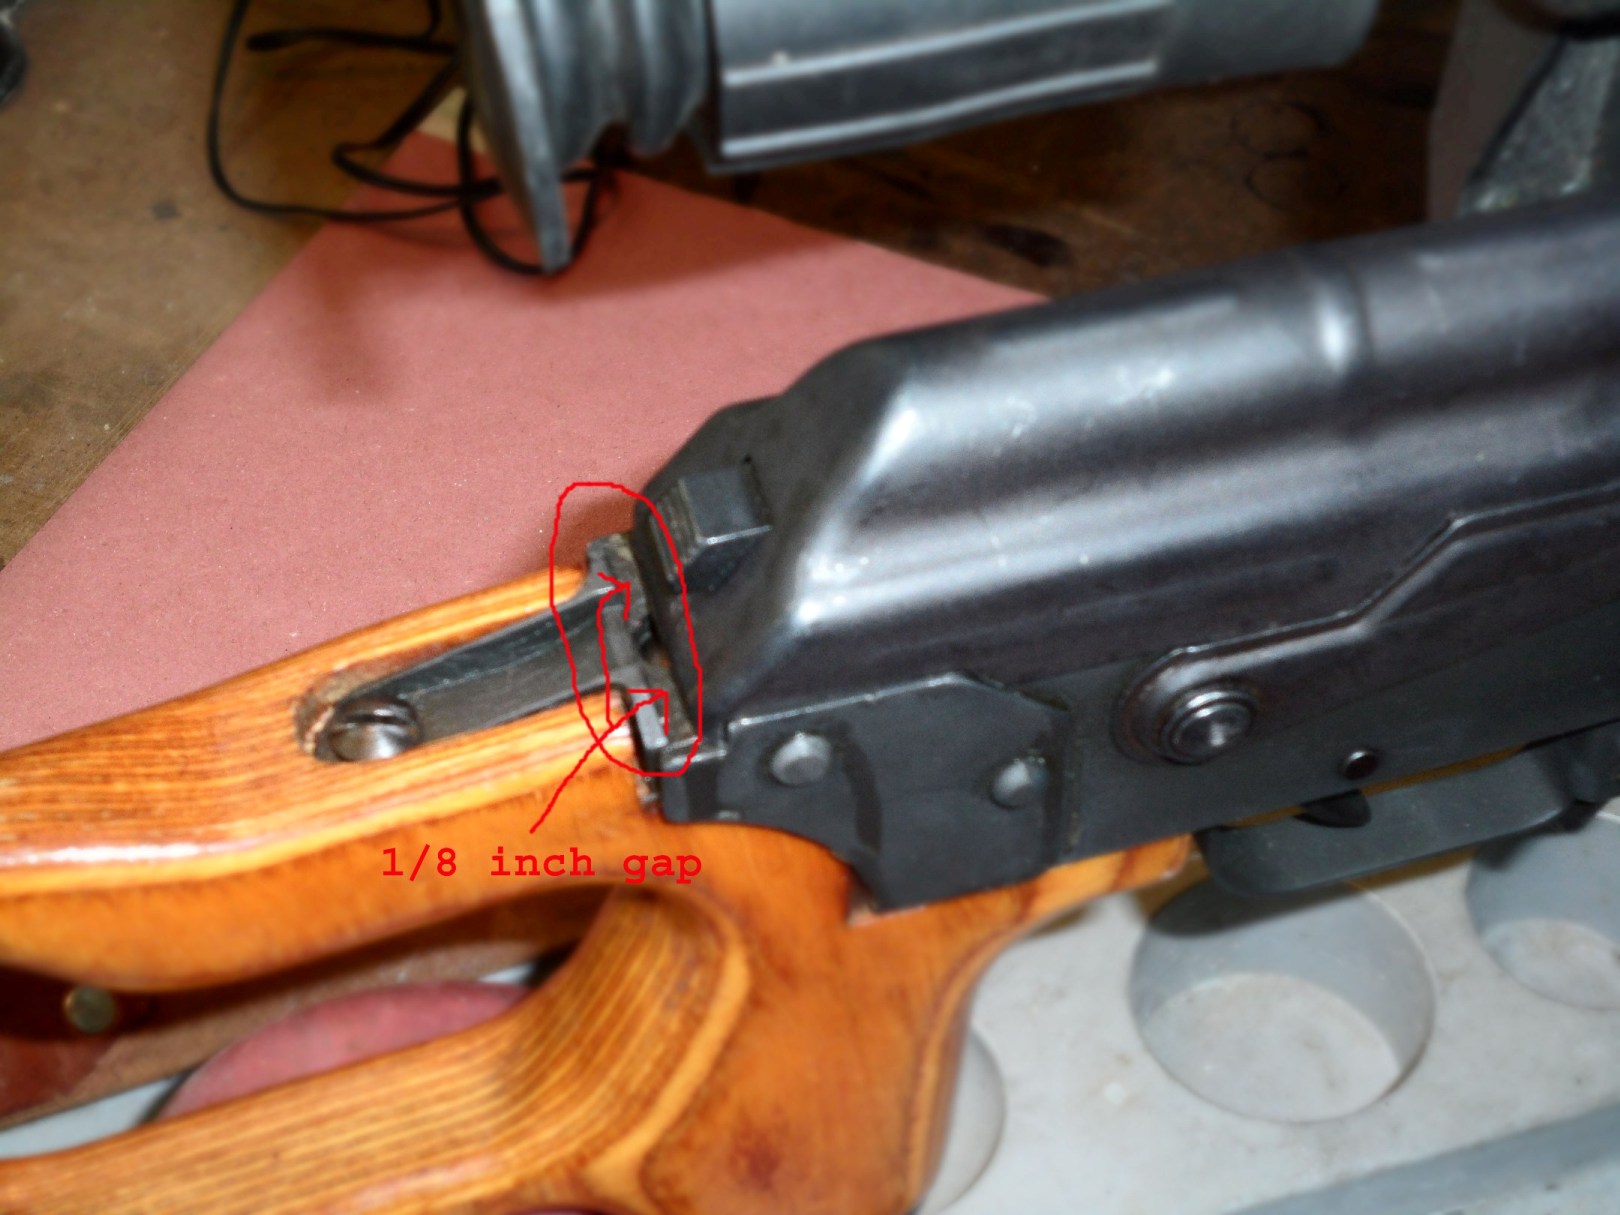
I just resolved one such lingering issue with my PSL sniper rifle project: the dust cover would work is way loose under recoil and sometimes pop off. This is not desirable. In the photo below, you can see why this would happen. There is a gap of a hair over 1/8 inch between the back of the dust cover and the back of the rear trunnion (a.k.a. stock tang). Under recoil, the dust cover would gradually slip back until it popped loose at the front.
Also, the dust cover would not go forward quite as far as it should, it stopped about 1/16 inch short.
The solution is to somehow fill the gap and fit the dust cover a bit better. This area is not stress bearing so I did not have to fill it with hardened steel. After wandering hardware stores for God knows how long just looking at everything trying to find a solution, I found the perfect material; 1/8 inch square brass rods at Ace hardware.
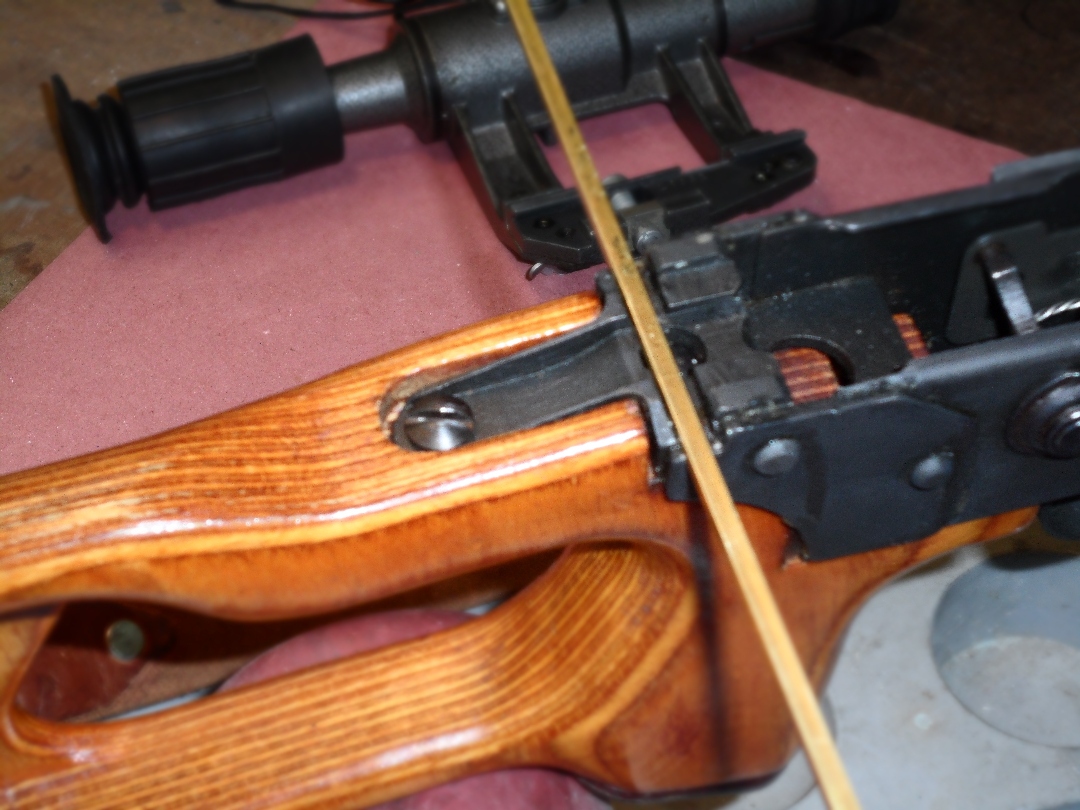
The photo below shows the brass square rod being test fitted. It was perfect.
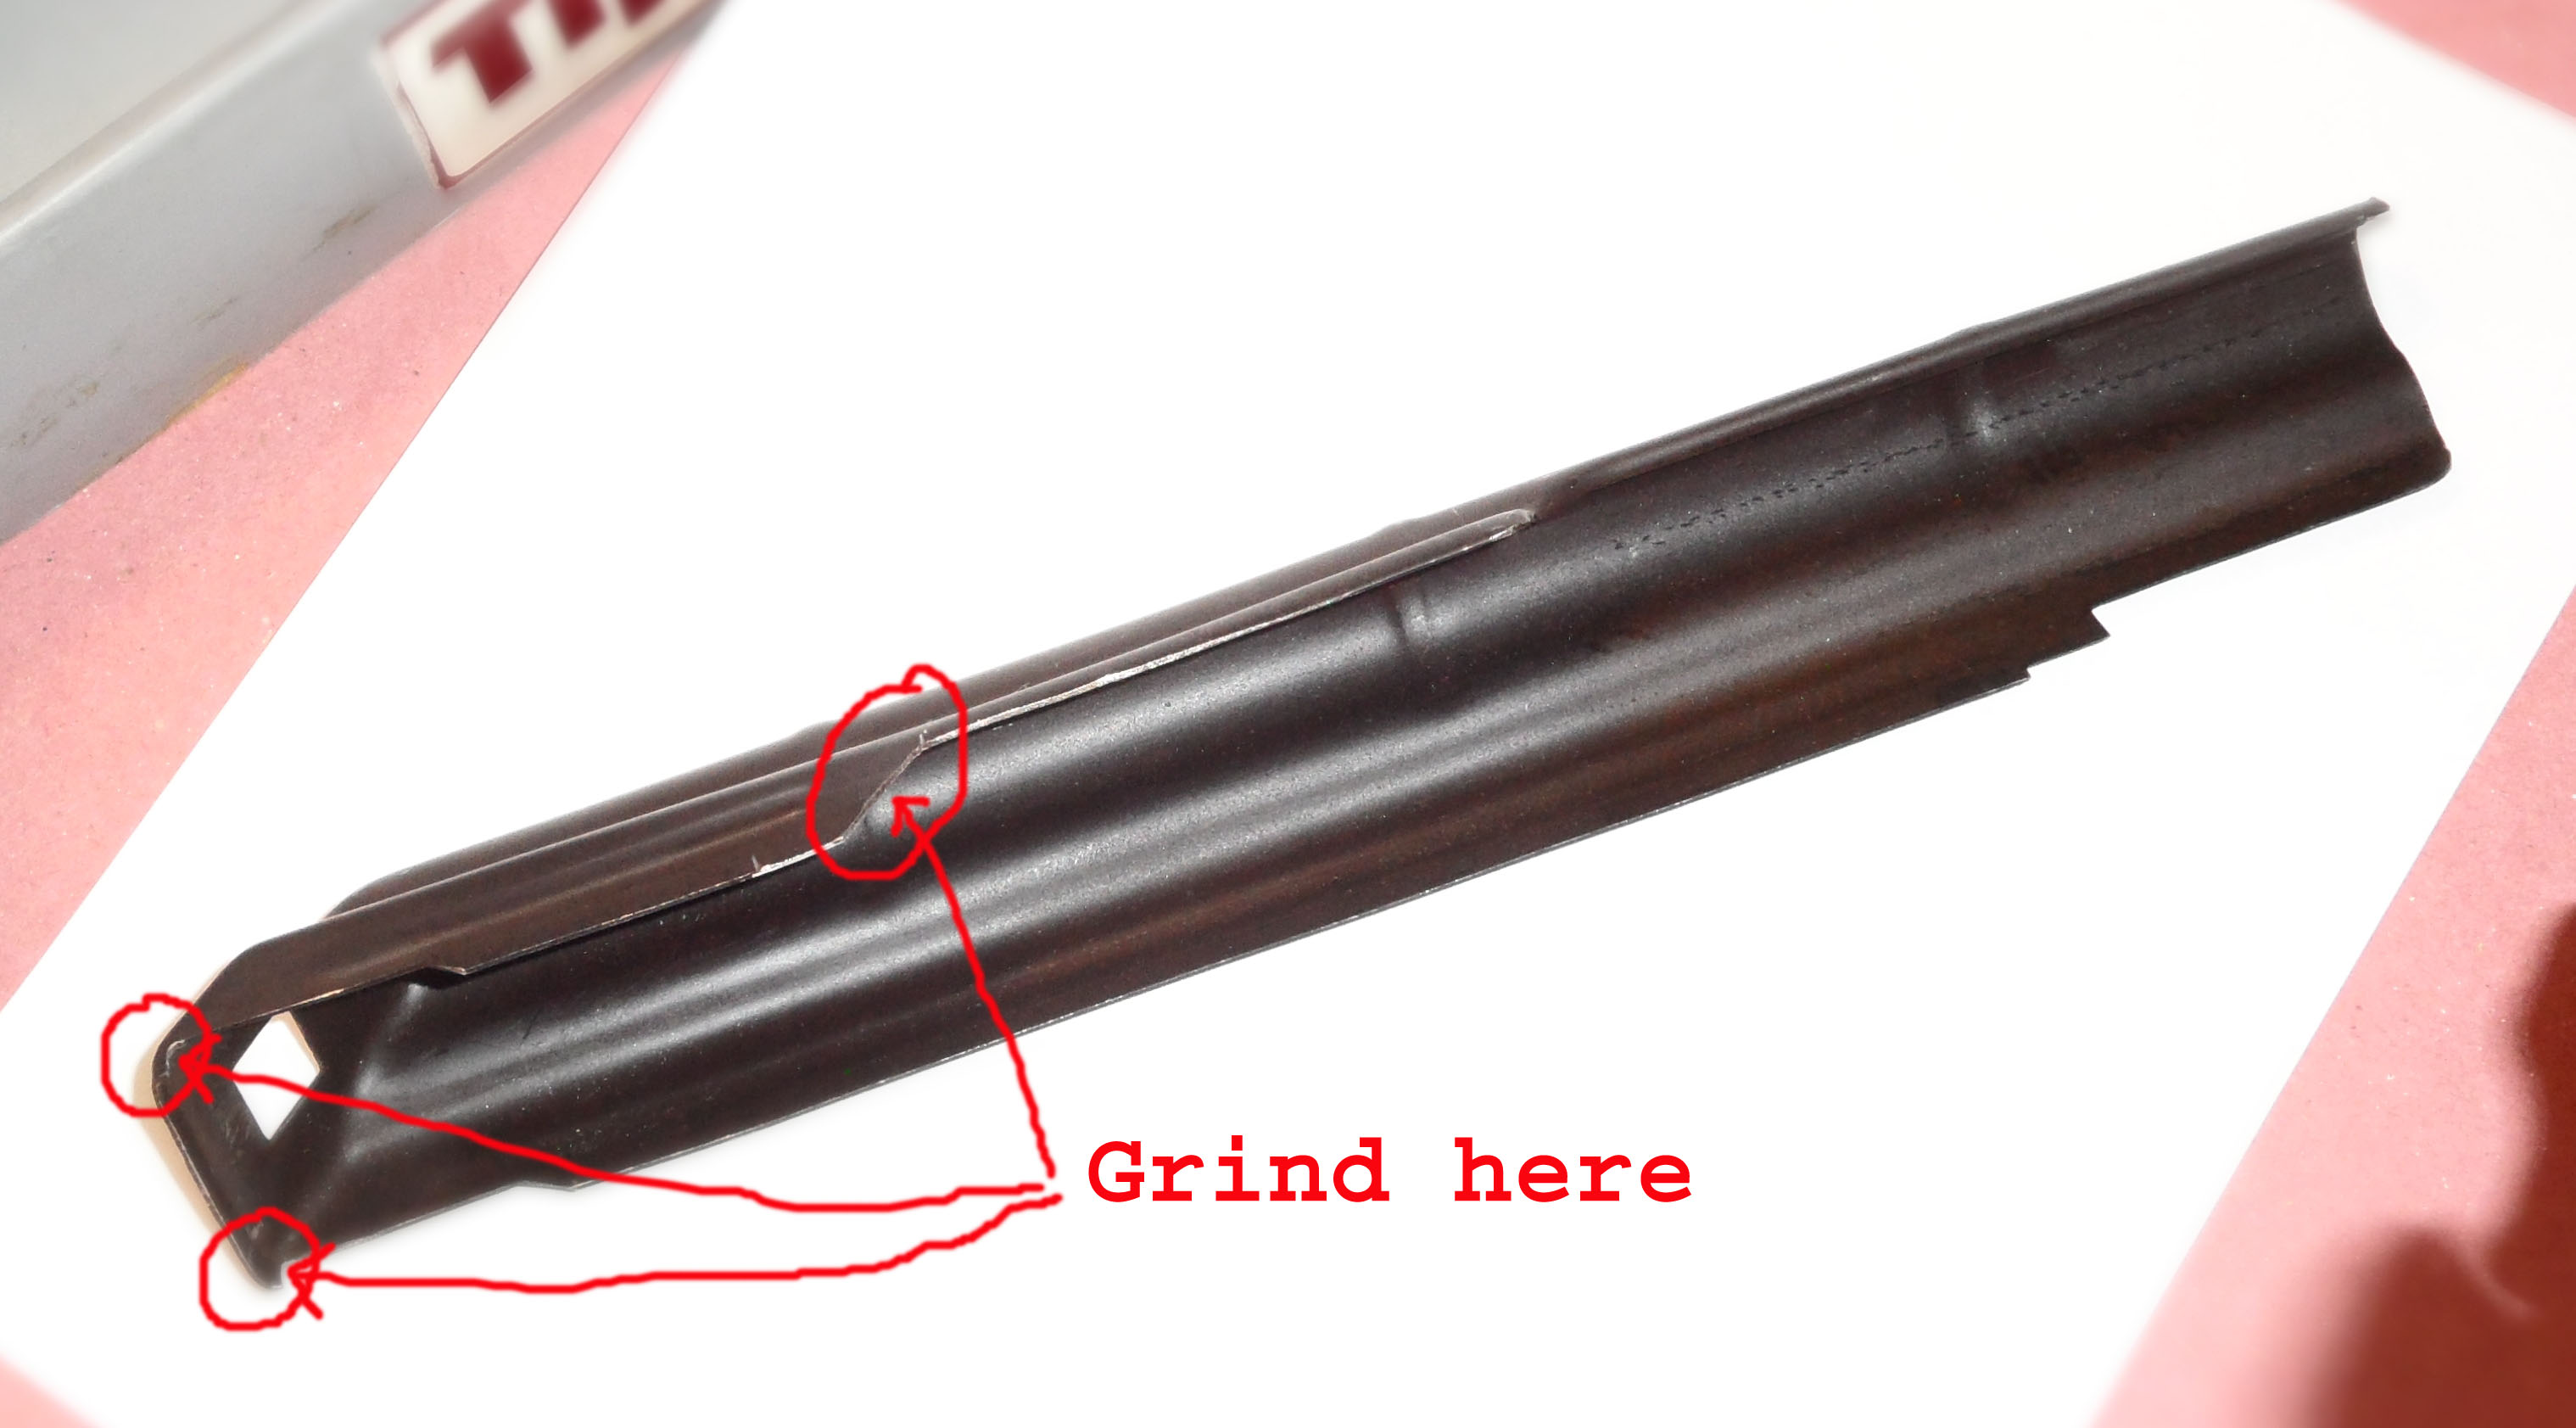
I had to do some strategic grinding and re-bluing of the dust cover to get it to slide all the way forward as shown in the following photo.
In filling the gap, one constraint is that I could not cover the screw hole for the screw that secures the stock. So I cut two 1/2 inch lengths of the square brass material. One piece would be installed on either side of the rear trunnion screw hole.
To install it, first I blackened the two pieces using Brass Black solution. Second, with a dremel tool and a circular metal brush bit, I cleared the Parkerizing off of the two areas on the rear trunnion that would contact the brass. Then I J-B Welded the two pieces in place. J-B Weld is fantastic stuff. It’s a two-part epoxy specifically for metal. J-B Weld has a tensile strength of 3960 PSI and can withstand temperatures up to 550şF when fully cured. I use tons of the stuff, especially for rocketry.
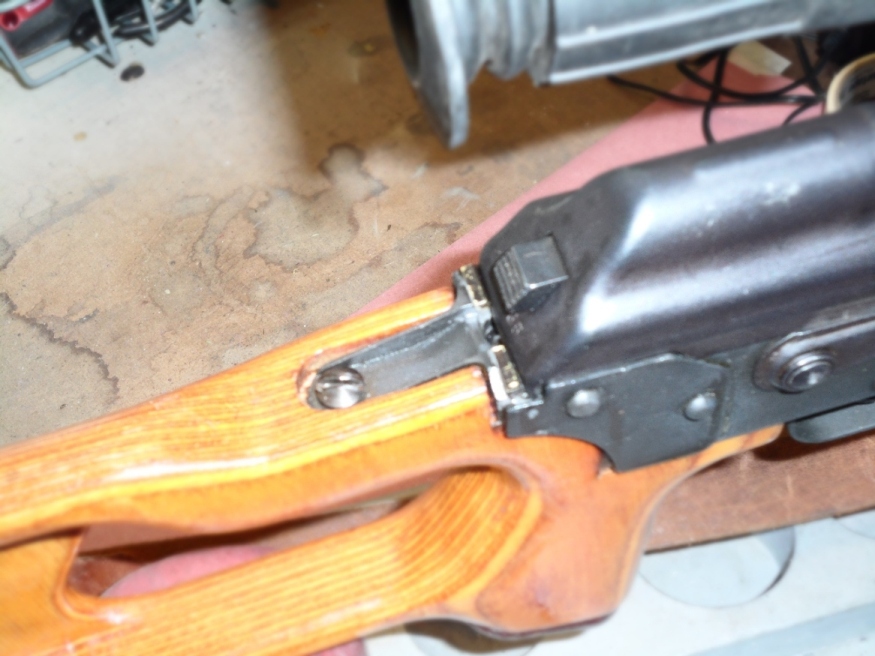
The photo below is not very good but it shows the final product with the two half inch pieces J-B welded in place. The dust cover is now very secure and will never come out when I don’t want it to.
Recoil Buffer
At this point I also added a recoil buffer from Blackjack Buffers LLC. This buffer cusions the hard impact of the bolt slamming against the stock tang. I really like the feel of this rifle with the buffer installed. It's not as harsh.